With the New Message tool, you can send email or texts to your community! Each contact receives a unique message and will not see who else the message was sent to. You can send a message to the parents of a selection, schedule it to send later, honor bulk opt-out requests, and the list goes on! Keep reading for a detailed walk-through on sending an email or text using the New Message tool.
To ensure your staff and volunteers can send emails using the New Message tool, the User's Email Quota in at least one Security Role must be greater than 0.
When you open the New Message tool, you'll see the Message tab first.
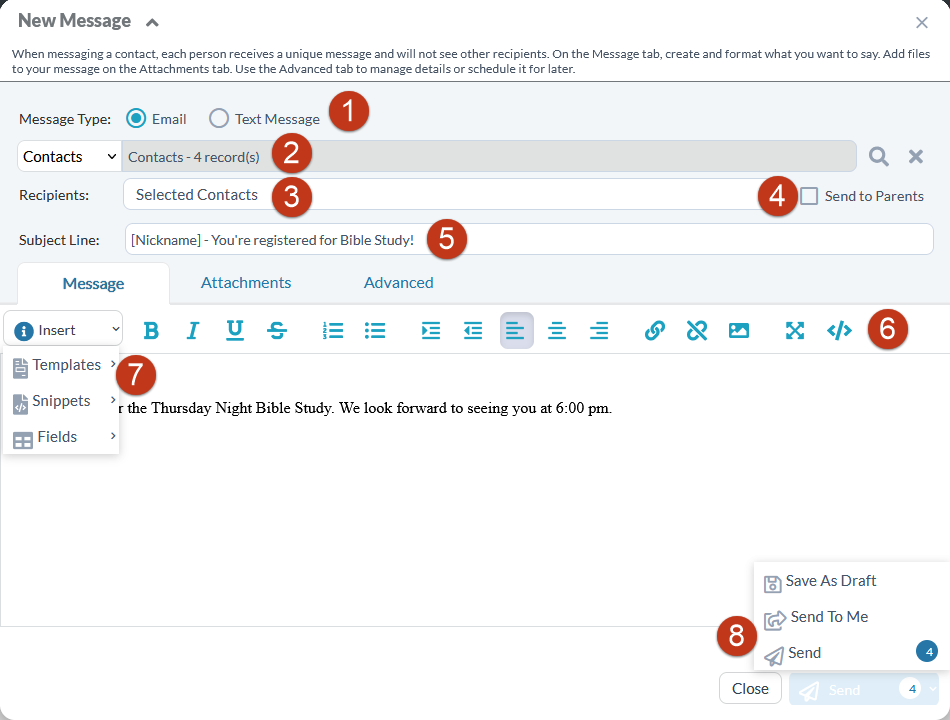
Select how you'd like to send your message, either by email or text. If your system is not configured to send text messages, you will not see this section or the two options.
If launched from a selection, the selected records are captured here. You can click the (...) to select different or additional records. Each Contact will receive a unique email and cannot see who else received the same Message.
This list presents related records based on Sub-Page Views. To appear in this list, a Sub-Page View must have Messaging View = "True."
Checking this box sends the Message to the parents of the Recipients. "Parent" is defined as any Household Member with the Household Position of "Head of Household" who has a valid email address and is not inactive/deceased. If the selected recipient is a Head of Household, they will not receive an email—nor will the other Head in their Household. Note: It also includes any Heads of Household associated via Other Household with Household Type "Non-Custodial Parent" unless the relationship is end-dated. And also note: If the Parent has opted out of receiving bulk emails, they will not be included when the message is sent. To include them, be sure to check the "Include recipients who have opted out of bulk email" box on the Advanced tab as described below.
The Message's subject line. A subject line is required for sending a Message from the New Message Tool.
The New Message Tool has a variety of formatting options, including: bold, italics, underline, strike-through, numbered list, bullet list, indent, outdent, align left, align center, align right, create link, remove link, insert image, toggle full screen, view HTML source. Note: If you view the HTML source, be sure to switch it back to the text before hitting send. If you don't, everyone will receive the HTML version of your email, which, depending on your audience, might make it challenging to read.
Click "Insert" to display the Templates, Snippets, and Fields options.
Templates
If desired, you can choose a Template. Templates are useful for Messages sent with frequency or for ensuring consistent language. The list is organized based on the Template's Pertains to Page and the Page your recipient list was selected from. Any edits you make to a Template in the New Message Tool only apply to this specific Message (and do not update the Template record). Templates are available to Users with at least Read level permissions on the Templates page. Users will see Templates they have access to based on the Template User and Template User Group fields on the Template record.
Snippets
If desired, you can include Snippets in your Message. Snippets are pre-written HTML text that can be reused over and over again. They often include links that quickly and easily grant the Message Recipient automatic access to their Portal account.
Fields
If desired, you can include Contact Fields in your Message. These merge fields facilitate personalizing a Message for the Recipient. For example, using the [Nickname] merge field automatically adds the Recipient's Nickname to the Message. If Send to Parents is used, the fields will be populated with the child's (the selected record) data.
If desired, you can include From User Fields in your Message. These merge fields facilitate personalizing a Message for the Sender. For example, using the [From_User_Nickname] merge field automatically adds the Sender's Nickname to the Message. Sender is defined as the currently authenticated User or a selected User for whom they are a delegate.
If desired, you can include Data Fields in your Message. These are merge fields that allow you to quickly and easily add page-specific data to a Message. Data Fields are available on every page except Contacts. The Message must be sent via the selected page, rather than from the Home page. If Send to Parents is used, the fields will be populated with the child's (the selected record) data. Data fields are based on sub-page fields if a sub-page view is selected for the Recipients list.
Hover over the Send button to reveal the options: Save as Draft, Send to Me, and Send. A Message can be saved as a draft at any time. Once complete, a Message can be sent. Note that if no Contact Fields or Data Fields are used in the Message, duplicate emails are automatically removed. For example, if a husband and wife have the same email address in each of their Contact records and both of their records are in the selection, one email would be sent to the one email address. (The Send count shown is calculated prior to duplicates being removed.)
To receive a copy of the Message for review before sending to all Recipients, select "Send to Me". If you included merge fields, they will be rendered using the first recipient's information. Attached files are also included. This gives you an accurate preview of what you're about to send!
On the Attachments tab of the New Message tool, you can attach, view, and remove attached files. There is a 20 MB file size restriction. Additionally, the receiving systems (and possibly your sending system/SMTP server) may have smaller file size restrictions and, if so, those restrictions may prevent your email from being successfully delivered.
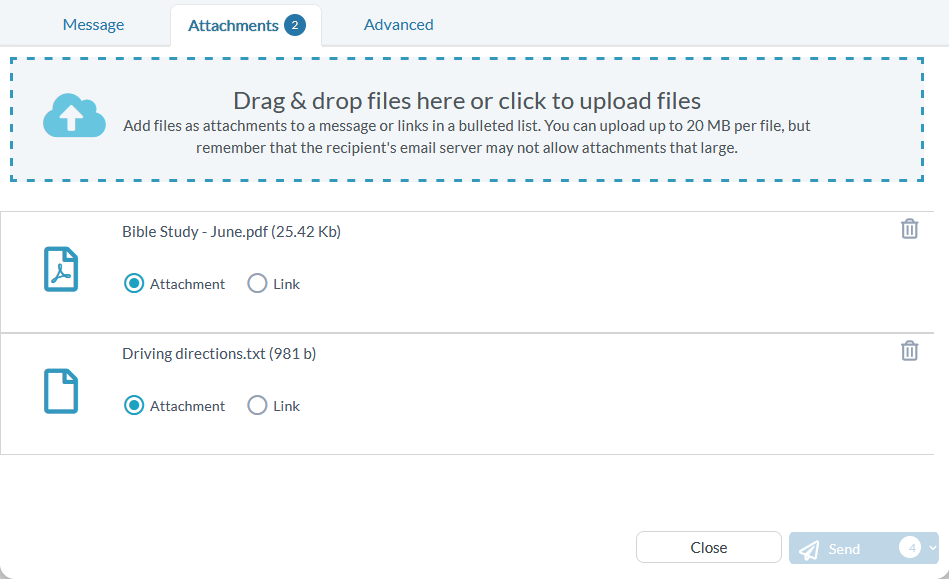
When attaching, you have the option to:
If you have multiple attachments, you can mix and match. Choosing Add as Link will add a bulleted list of links (one link for each attachment) to the bottom of the email. These links will not be visible on the Message record inside the tool. The recipient can click the link to open the attachment in their browser. The file is saved on the Message record and the link will pull the attachment from your MP server.
When at
least one attachment has been added, a current count of attachments is
visible via the badge icon overlaid on the Attached Files tab. This icon
will also display a count if a selected Template contains attachments.
The Advanced tab allows you to further customize your Message:
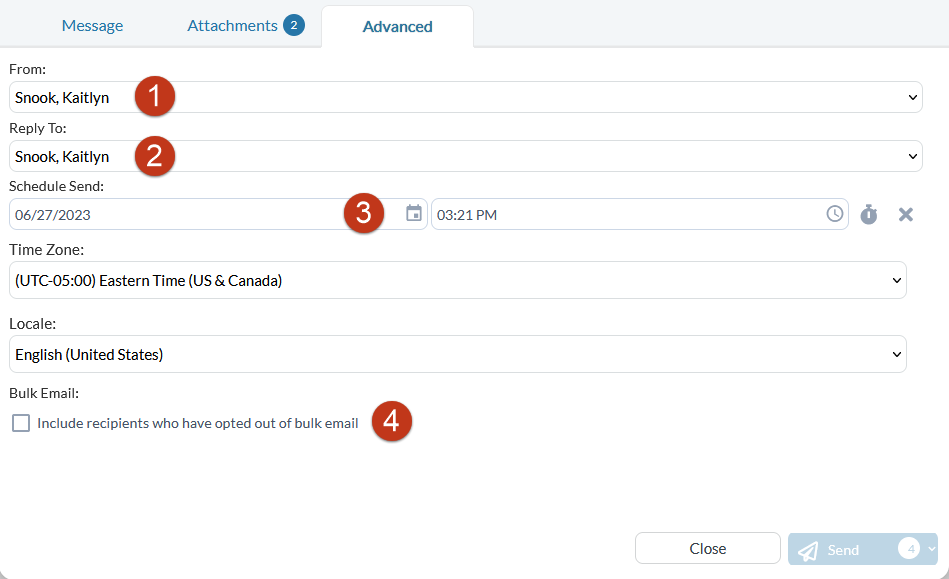
The From drop-down indicates who is the sender of the Message. If a SPoC has granted a User rights to send on behalf of someone else, the From drop-down will include additional names. Note: If a From Contact is indicated on a Template, the sender of the email needs to be a delegate for that value to be honored.
The Reply To drop-down indicates who receives replies to the Message. If a SPoC has granted a User rights to allow them to indicate someone other than themselves in the Reply-To drop-down, the Reply-To drop-down includes additional names. Note that email clients often handle out-of-office messages differently than replies; out-of-office messages may be returned directly to the sender indicated in the From drop-down. Note: If a Reply to Contact t is indicated on a Template, the sender of the email needs to be a delegate for that value to be honored.
You can schedule a Message to be sent at a future time.
Selecting the option "Include recipients who have opted out of bulk email" includes Recipients whose Contact Records have Bulk Email Opt Out set to "Yes".
