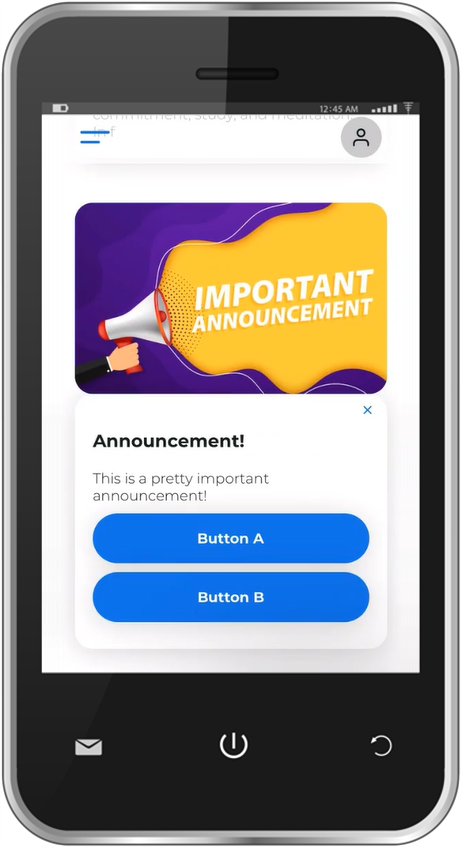
You can share information with app users on the Dashboard through Announcements. For example, got an upcoming event you'd like to feature? Or have a word of encouragement to share with everyone? Create an announcement! Make your announcement stand out
by adding a compelling image. You can even include buttons that take users to relevant areas of the app, like an event signup page.
Creating Announcements
You can create and manage announcements from the Platform. If needed, you can link the entire announcement or add buttons that link to another area.
- Go to PocketPlatform > Announcements.
- Click New Announcement.
- Select the Announcement Type to indicate what this announcement is for.
Note: The Sort Order and Enabled fields on the Announcement Type record determine if/where this type of announcement shows on the Dashboard. - Enter the Announcement Title that displays in bold at the top of the announcement.
- Enter the Body that displays below the title.
- Select the Start Date when this announcement should begin displaying on the Dashboard.
- Optionally, select the End Date when this announcement should stop displaying.
- For Enabled, select Yes to show the announcement on the Dashboard.
- If you want the entire announcement to be clickable (meaning app users can click anywhere on the announcement to go to another area), enter the Link URL.
- To link outside of the app, enter a fully qualified URL that starts with "http://" or "https://".
- To link to another area of PocketPlatform, we recommend using the Link Generator tool after saving this record. (Make sure to refresh the page so your link displays in the Link URL field!) Or, you can enter the relevant app link.
- If you would rather show a button under an announcement for users to click, see the steps below.
- If you have multiple announcements, enter a Position to indicate the order this announcement should display in relation to the others.
- If you want to allow app users to dismiss the announcement so they no longer see it on their Dashboard, set Dismissible to Yes.
- Click Save.
Add Buttons to an Announcement
- Open the Announcement record, and click the Buttons tab.
- Click New Announcement Button.
- For Button Text, enter the short phrase or word to display on the button.
- For Link URL, enter either a fully qualified link (with "http://" or "https://"), a generated link, or an app link.
Note that
this overrides the Link URL on the Announcement record, if entered. - Select the Start Date when this button should begin displaying on the Announcement.
- Optionally, select the End Date when this button should stop displaying. This may be useful for limited time offers, such as an early bird discount or certain registration periods.
- For Enabled, select Yes to show the button on the announcement.
- If you have multiple buttons, enter a Position to indicate the order this button should display in relation to the others.
- Click Save.
Add an Image to an Announcement
- Open the Announcement record.
- Expand the Files panel on the right, and click Attach File.
- Upload and attach the image.
- Close the record.
Announcements display on the Dashboard as soon as you save the record, assuming the Start Date is set to the current date/time. Otherwise, it displays as soon as the Start Date begins. If you set it to be dismissible, app users can click the X in the
corner of the announcement. If they want to see it again, they can go to Settings and click Reset Dashboard.
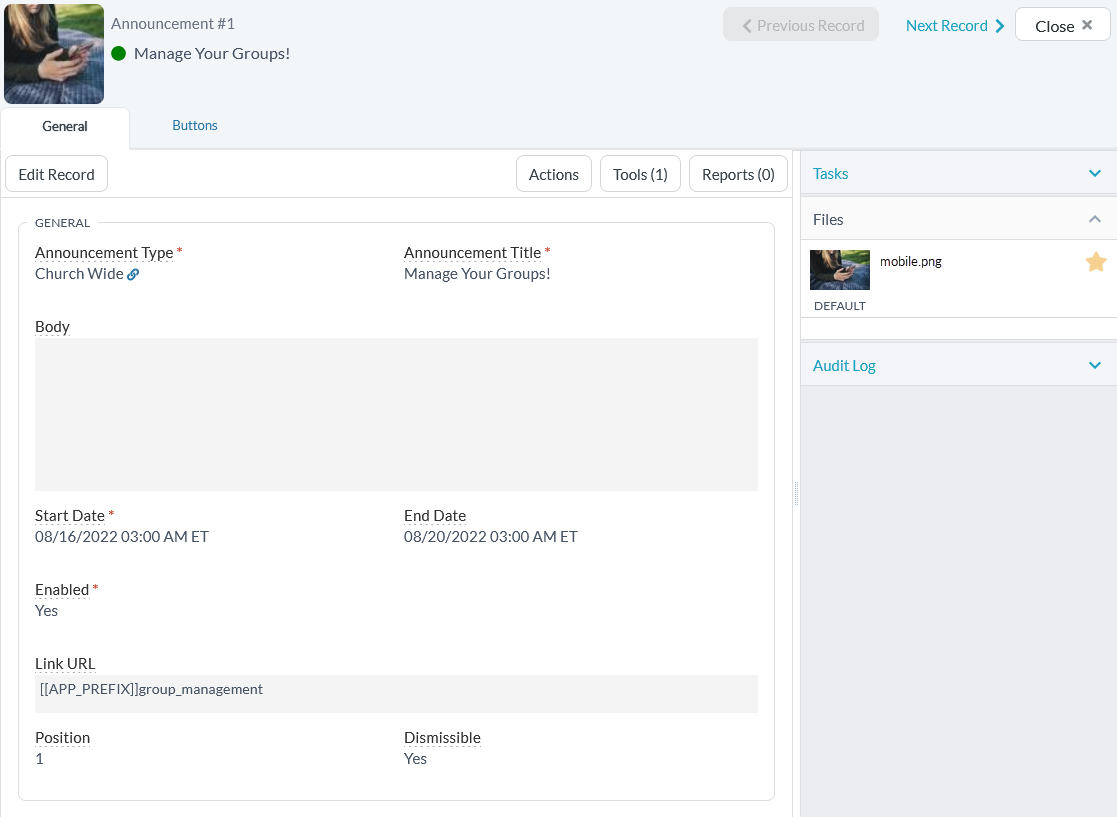
Here's an example of what an Announcement record might look like:
Showing Announcements to Certain Audiences
This feature is coming soon! SPoCs, keep an eye out for an email with more details. Before you can use this feature, our team will need to update your announcement recipe to the admin panel.
If you've set up audiences in the Platform, you can set an announcement to display for a certain group of people. For example, if you have an audience of women at your church, your app can show the upcoming Women's Retreat announcement only to those whose gender is set to Female.
To define an audience, open the Announcement record and set the Audience ID field to the one you want.
Announcement Scroller
You may want to share many announcements at the same time. Use a recipe to create
an announcement scroller! It shows announcements side by side instead of taking up lots of vertical space on the Dashboard. This way, app users can easily see all the important information on the Dashboard and choose whether to view all the announcements.
If you're interested, contact Support to get started.
