View Rules govern the styling of the super-cool
Record Facts and can
be applied to any View in the Grid layout. That's right—two awesome uses for the price of one! This offers a great way to visually emphasize important information, indicate missing information, and keep staff up-to-date without requiring a Platform
deep-dive.
 Basics
Record facts are curated collections of key information pulled from around the Platform to summarize and visualize what you've decided your users need to see at a glance. And the styling of the Record Facts is what makes the visual representation powerful.
The next generation of the Platform comes pre-loaded with a whole bunch of compellingly styled Record Facts. But you can edit those and create your own for both pages and sub-pages. You'll need edit rights to System Setup > Page View Rules to customize
your record facts on Pages and edit rights to System Setup> Subpage View Rules to customize your record facts on subpages.
- Formatting: An advanced user with edit rights to Page View Rules can easily format Record Facts without any JavaScript knowledge.
- Conditions: A power user with edit rights to Page View Rules and JavaScript knowledge (or a willingness to learn JavaScript) can create conditional view rules.
Ready to make those facts gorgeous? Here's how!
- Identify or create your view. That's right, you need to have a View before you can have a View Rule. It's like the chicken and the egg, but we know the answer—the View comes first.
- System Setup > Page View Rules or System Setup > Sub Page Rules
- Click on the Actions Menu and select "+ Page View Rule"
- Make your selections (see below)
- Click the Save icon
Note: You can also create View Rules directly from the View Rules tab on the Page or Sub Page View.
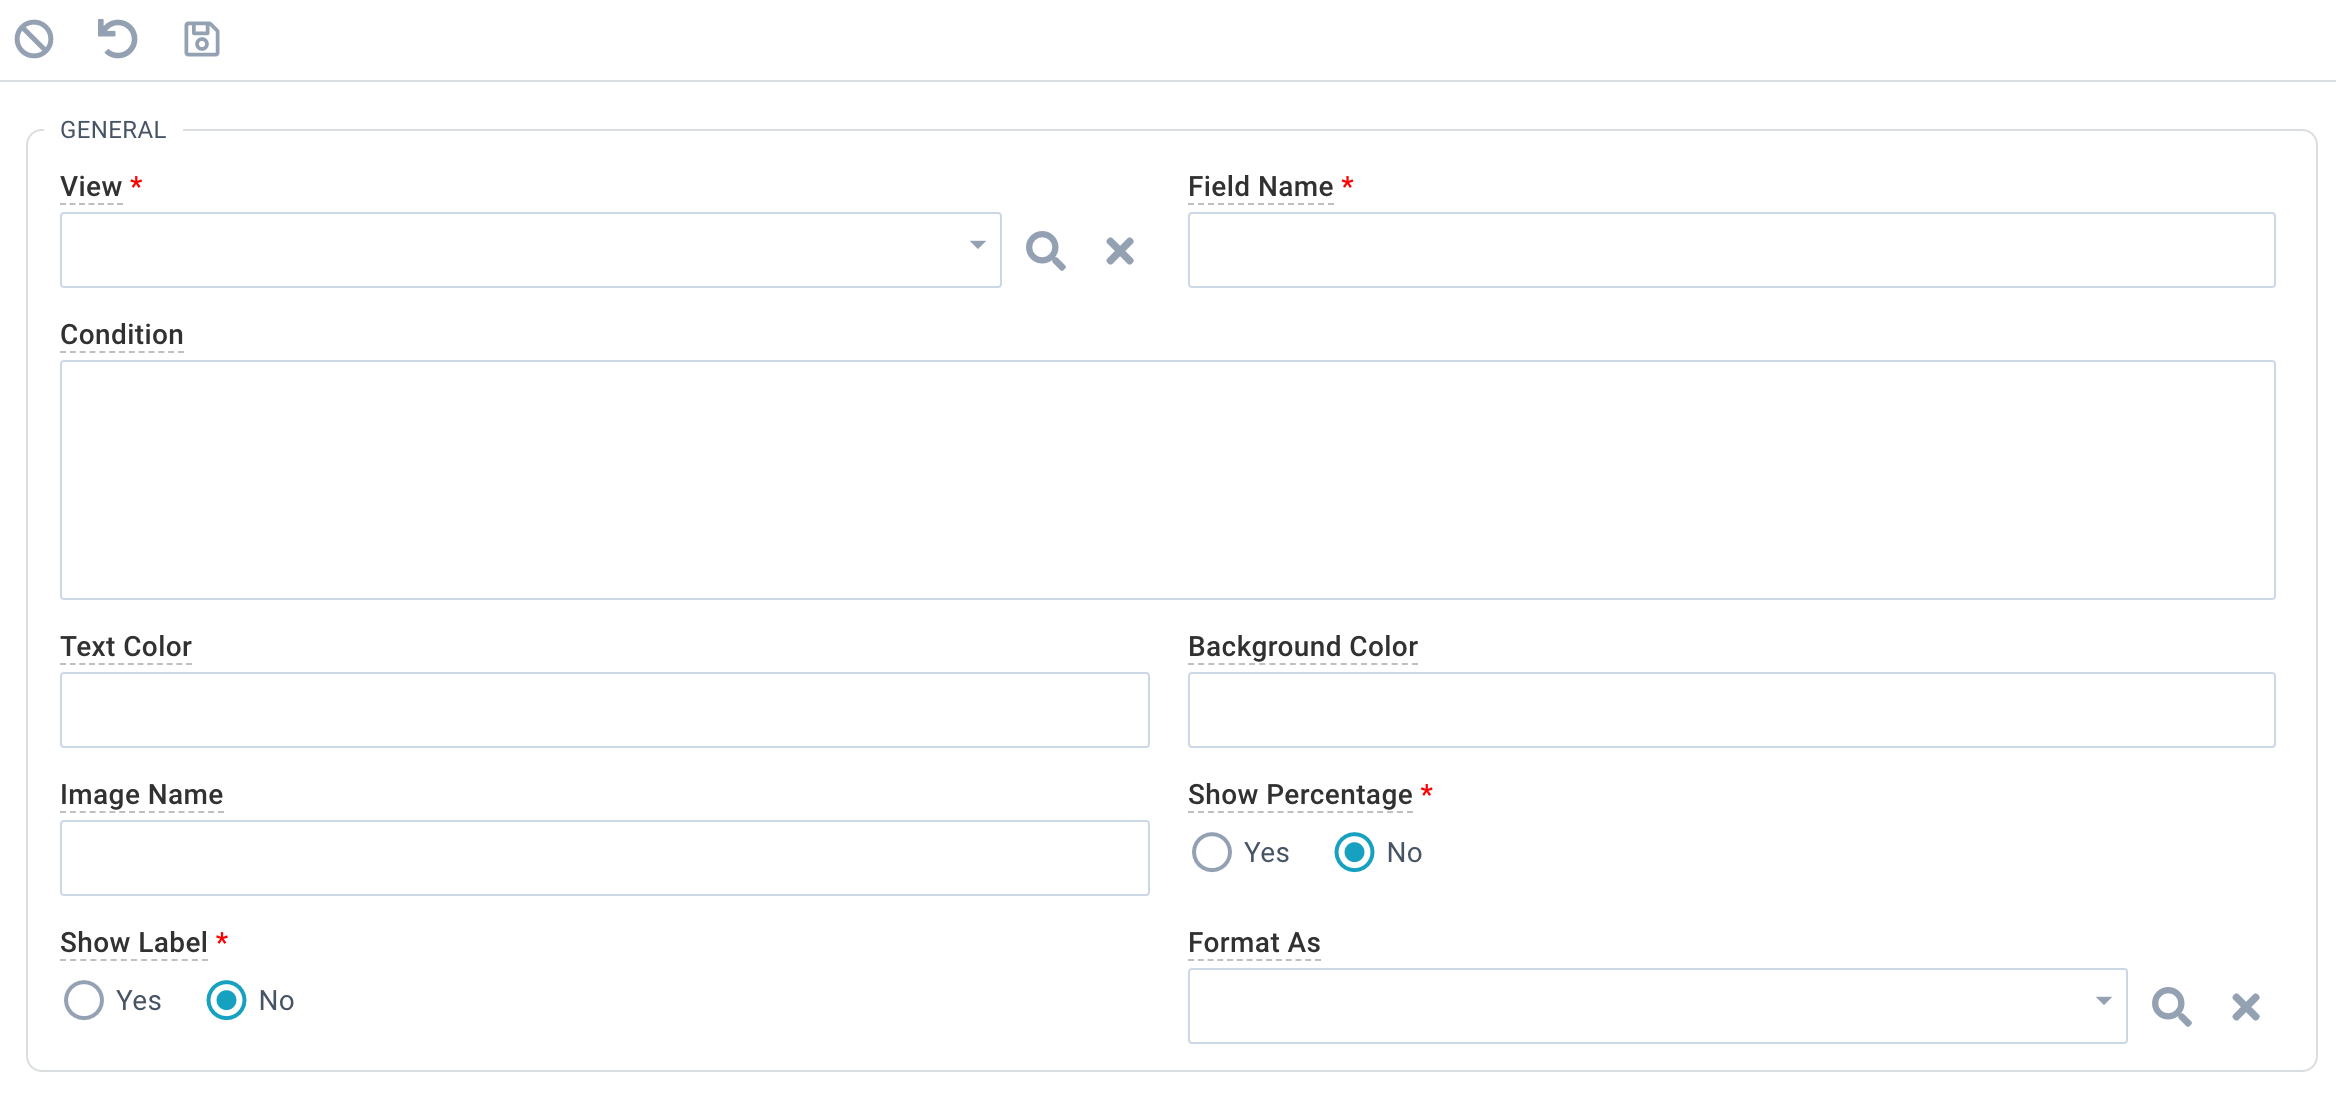
- View: The View that's getting some rules. To style Record Facts, the view will be a Facts View, but any view can have view rules. Note: The view must have a field list for View Rules
to work.
- Field Name: The specific column the View Rule applies to. If the column is aliased, refer to the alias.
- Condition: The conditions when this formatting should be applied. Must be expressed in JavaScript using {value} token and will be evaluated as true (formatting applied) or false (formatting not applied).
- Text Color: A hex code or color name for text color. If blank, the text is white.
- Background Color: A hex code or color name for background color. If blank, the background is grey. What to match new background colors to the provided Record Facts? Check out the handy chart below.
- Image Name: The name of the Font Awesome icon to be displayed. Note: Be
sure you're using the version 5 Font Awesome library. Image names must be configured like this - "fa-[image name]."
- Show Percentage: When true, this value will be styled as a percentage. If the background color is also defined, the percentage will be illustrated with a fill bar. Note: The percentage value itself must be calculated
in the View. See Record Facts for more information.
- Show Label: When true, the column name will appear before the column value. If the column is aliased, the alias will be displayed as the label.
- Format As:
- Color: If selected, your view will show a color box for the selected hex code. (You can see an example of what this looks like on System Lookups > Chart Colors.)
- Email: If selected, clicking email addresses from desktop or mobile devices launches your email provider.
- Phone: If selected, clicking phone numbers from desktop or mobile devices launches your phone application.
- Blank: If your Record Fact should not be formatted as one of the other options, leave this field blank.
Note: View Rules should always contain mutually exclusive conditions (for example, green if Member, blue if Faithful Non-Member). If a field meets the condition of multiple, overlapping View Rules
then multiple Record Facts will appear. Avoid this by crafting View Rules that do not overlap.
Background Color Hex Codes
The next generation of the platform comes preloaded with a ton of great record facts. But maybe the colors we choose just aren't for you. No worries! You can do YOUR church YOUR way and customize your own record facts colors. Have branded colors
for your church? Awesome! Add those hex codes. Don't have branded colors? The sky's the limit! Have fun!
Want to use the colors that came with your pre-loaded record facts? Here's the hex codes so you can get creating!

Positive
#98C697
Noteworthy
#CBB145
Neutral
#AFC2C9
Progression
#ABDDF0
#67C5DF
#3398BE
Bad / Warning
#A94444
Record Facts Examples
Record Facts are styled with View Rules applied to a Facts View. They are visible in the List layout and in an open record.
Background Formatting
- User: Advanced user with edit rights to Page View Rules
- Goal: Add a background color to the Group Type field
- How
- Complete the View and Field Name fields.
- Add the color name or HTML hex code to the Background Color field.
- Leave the other fields empty or at their default.
- Click the save icon.
On the Groups Page

In the Open Record

Background, Icon, & Label Formatting
- User: Advanced user with edit rights to Page View Rules
- Goal: Add a background color and field label to the Group Type field
- How
- Complete the View and Field Name fields.
- Add the color name or HTML hex code to the Background Color field.
- Add FontAwesome image name to Image Name field.
- Show Label = Yes.
- Click the save icon.
On the Groups Page

In the Open Record

Background, Icon, & Condition Formatting
Adding a condition requires JavaScript knowledge. We've included some basic examples below to get you started. Note: You'll need to add separate view rules for each value. So if you want a different color
to display for three Participant Engagement levels, you'll need to add three view rules, one for each level.
- User: Power user with edit rights to Page View Rules and JavaScript Knowledge.
- Goal: Add a background color that changes based on the value in the Participant Engagement field.
- How
- Complete the View and Field Name fields.
- Add a single condition to the Conditions field.
- Add the color name or HTML hex code for this single Participant Engagement level to the Background Color field.
- Add FontAwesome image name to Image Name field.
- Click the save icon
- Repeat for each Participant Engagement level, including a different condition, using a different color name or HTML hex code in the Background Color field, and a different Font Awesome image name.
JavaScript Conditions
{value}=='Observing'{value}=='Partially Engaged'{value}=='Fully Engaged'On the Participants Page

View Examples
Any field in any view can be styled using View Rules. This can be seen in Grid layout and is incredibly helpful in drawing attention to key fields. Use View Rules to style your fields to help ministry leaders serve their people well. Note: There's
no need to set Show Label = True when using View Rules on a non-facts view; the field label will be the header for the column.
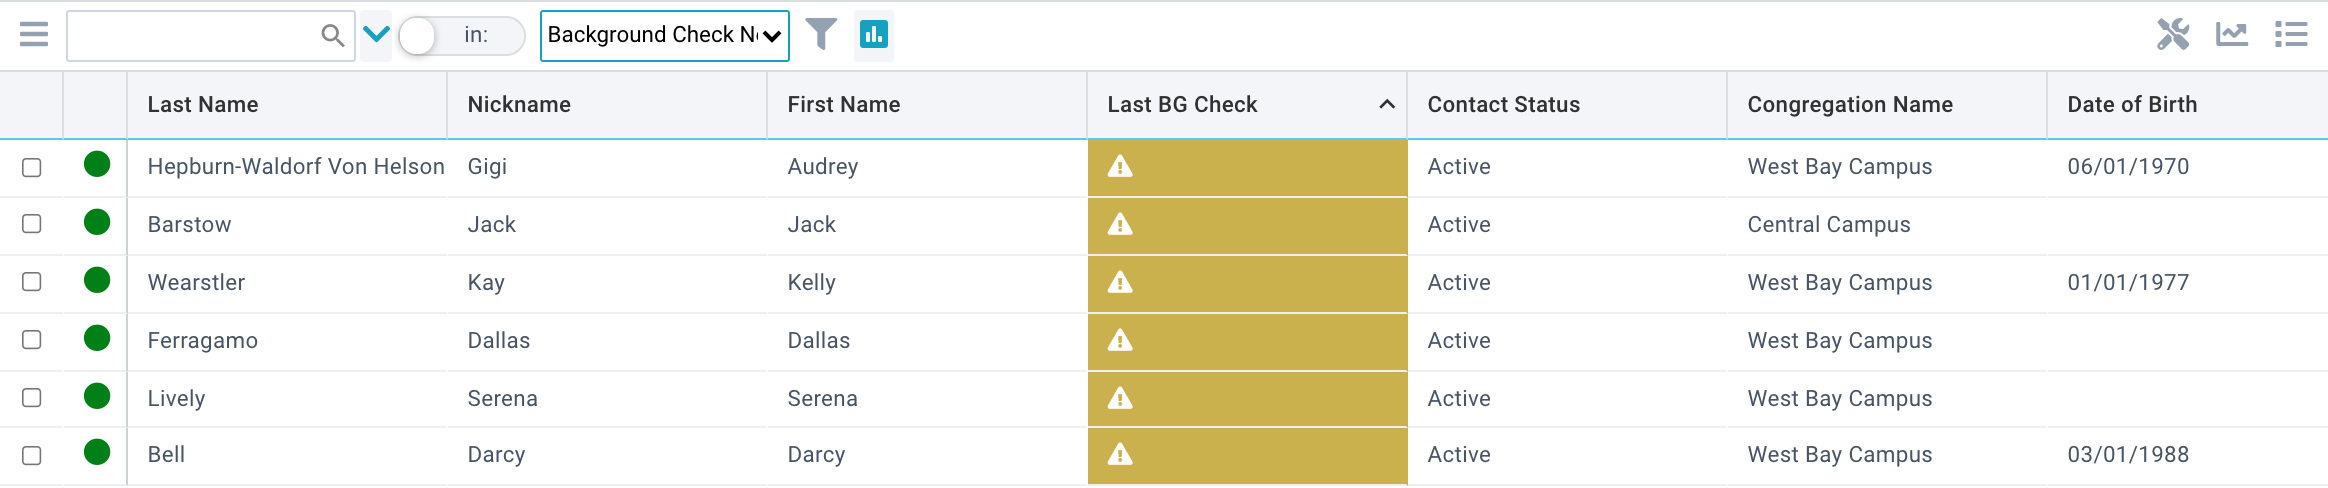
Background & Icon Formatting
- User: Advanced user with edit rights to Page View Rules.
- Goal: Add a background color and icon to the Last BG Check field of the Background Check Needed view on the Participants page.
- How
- Complete the View and Field Name fields (in this case, Last Background Check)
- Add the color name or HTML hex code to the Background Color field.
- Add FontAwesome image name to Image Name field.
- Click the save icon.
Icon & Conditional Formatting
Adding a condition requires JavaScript knowledge. Note: You'll need to add separate view rules for each value.
- User: Power user with edit rights to Page View Rules and JavaScript Knowledge.
- Goal: Add an icon when the Date of Birth field is null in the Background Check Needed view on the Participants page.
- How
- Complete the View and Field Name fields (in this case, Date of Birth)
- Add a single condition to the Conditions field.
- Add FontAwesome image name to Image Name field.
- Click the save icon.
Java Script Condition
{value}==null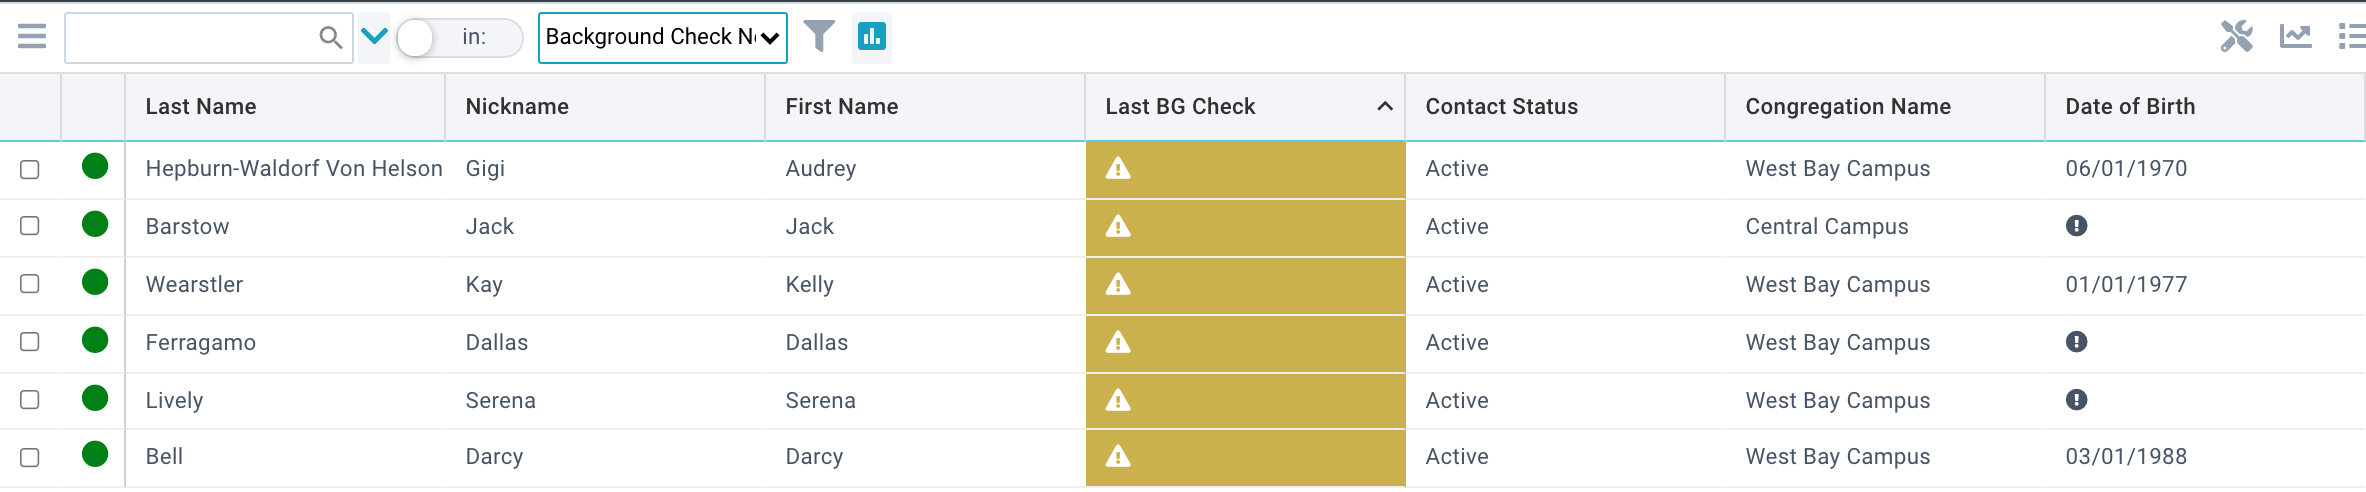
JavaScript Examples & Tips
Examples
We know the legacy Platform was all SQL all the time. But here's your chance to dive into a new skill and work with JavaScript. Some ideas to get you started:
Integer Greater Than a Certain Value
+{value} > 100Integer Between Two Values
{value} > 100 && {value} < 1000Null
{value}==nullNull (Hides a Record Fact if the Value is Null). Note that {value}!= means "not equals."
{value}!=nullStarts With
{value}.startsWith("a")Value Greater Than or Equal To (or Less Than or Equal To)
{value} >= 1000{value} <= 1000Exact Match
{value} == 'active'Date Greater Than the Current Date
new Date({value}) > new Date()Tips & Tricks
JavaScript is fun, right!?! Here are some tips and tricks to help you along the way:
- JavaScript is case-sensitive. So {value}=='bobsmith' is not the same as {value}=='BobSmith.'
- JavaScript uses quotation marks to define strings ('bobsmith' and 'BobSmith' are the strings in the example above). But if you include an apostrophe in a string defined by single quotes, the string will be broken
and your formatting won't work. Instead, use double quotes to define a string containing apostrophes, and {value}=="Women's Ministry" will let you apply conditional formatting to a Ministry Name field.
- There isn't a fail-over condition. And that means when working with conditions, you'll need to define all possible conditions in advance. If you define two color change conditions and there are ten possible
options, the eight options that don't get a color change get suppressed entirely. So be strategic when setting conditions or someone could get left out.
- The {value}== needs to match the SQL value. For example, the record may show "Yes" or "True," but the SQL is actually "1," so the condition is {value}=='1'.
Want help getting your View Rules set up? Don't hesitate to send any issues or questions to
Support at any point
during your transition. Ask Support about how to engage a Coach.
