In order to provide External Authentication, you must create and properly configure an Identity Provider.
In MinistryPlatform:
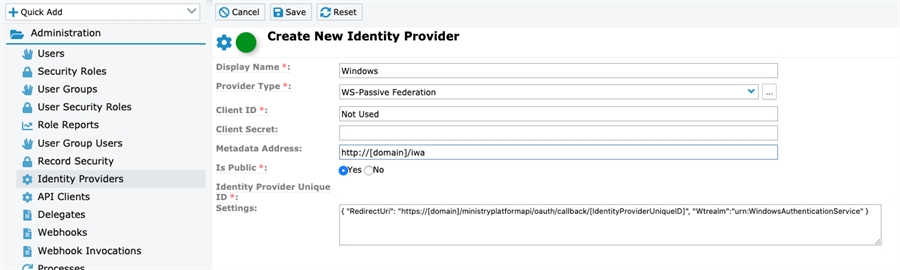
This callback url is created by taking the guid from the Identity Provider and adding it to the base callback url.
The [IdentityProviderUniqueID] must be replaced with the ALL UPPERCASE GUID from your Identity Provider record. Be sure to replace "{your platform domain}" in the following code with your church's base MP URL.
https://{your platform domain}/ministryplatformapi/oauth/callback/[IdentityProviderUniqueID]You will use this in A.2 below.
Below is a chunk of JSON code that needs to be updated and entered in the settings. It incorporates the External Login Callback URL from the previous step.
{ "RedirectUri": "https://[Domain]/ministryplatformapi/oauth/callback/[IdentityProviderUniqueID]", "Wtrealm":"urn:WindowsAuthenticationService" }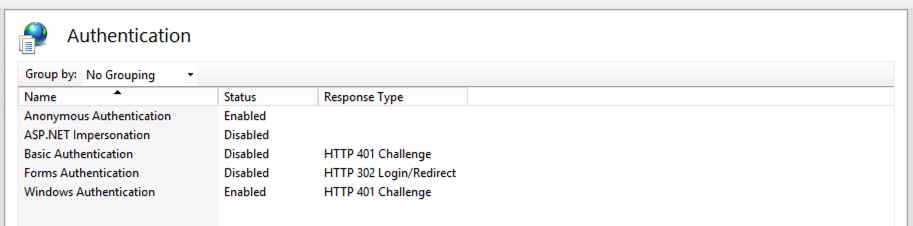
Note: The Application Pool may need to be restarted for new Identity Providers to be configurable for Users. If Setup Admin is set to True on your User record, you will have a Restart Auth App button on your User Profile. Clicking that button will make the external authentication option available.
More information about enabling Windows Authentication for a Web Application can be found here: https://docs.microsoft.com/en-us/iis/configuration/system.webserver/security/authentication/windowsauthentication/
C. Test by Logging into the Platform
Once complete, a button for Windows Authentication will appear on your Login page. Before testing, configure the Social Login for your User in the User Account dialog.
To remove a previously configured Identity Provider, delete the Identity Provider record. Note: It will take overnight (or a manual refresh of the IIS Application Pool) for the button to be removed from your Login page.
