Note: Google+ Sign-In has been deprecated. Going forward please migrate to the more comprehensive Google Sign-In.
Existing Google External Login Authentication
Already set up your Google External Login Authentication with Google+ and getting an error message? You'll need to relink your account using new a new Google account.
- Navigate to Administration > Identity Providers
- Open the Google Identity Provider Record
- Remove existing the Client ID and Client Secret
- Add a new Client ID and Client Secret created using Google's Cloud Platform Console (see below)
- Save
Note: Changes to identity providers are only picked up with a full application pool reset. This will happen overnight, but if you have access to your server, you can reset the app pool. Contact Support for assistance.
New Google External Login Authentication
Want to let your users create an account or log into the Platform using their Google account? You can do that! To set up your Google external login, you'll need to access to three places:
- MinistryPlatform, with rights to the Identity Providers page.
- Google's Cloud Platform Console.
- Your server. Important: If you do not have access to your server, coordinate this set up with someone who does. Contact Support for
assistance.
Pro Tip: It will be helpful to be logged into the Platform and Google's Cloud Platform Console at the same time.
Create an Identity Provider in the Platform
- Navigate to Administration > Identity Providers.
- Select New.
- Add a Display Name.
- Select Provider Type "Google."
- Add a Client ID. Note: This will be replaced during the set up process, so any value will be fine.
- Save
- Copy the Identity Provider Unique ID that is generated when you save. You'll need this later. Pro Tip: You'll need this value with all uppercase letters. Check out convertcase.net for a handy shortcut ;).
Create and Configure the Google Identity
- Go to the Google Cloud Platform Console
- Select a project or create a new one.
- If this is your first time creating a client ID, you'll be prompted to configure your consent screen.
- Pro tip: Use an administrative email (for example, support@{your church domain}).
- Scopes: Adding scopes is not required. If you choose to add scopes, your app might require approval from Google.
- Test User: You'll start in testing mode and only test users are able to access the app. The allowed user cap prior to app verification is 100, and is counted over the entire lifetime of the app.
- Select Credentials.
- Click New Credentials, then select OAuth client ID.
- Select Web Application as your application type.
- Enter any additional required information required.
- Add Your URI: Your website URL (for example, "https://[YOURDOMAIN]/ministryplatform").
- Add your Authorized Redirect URIs
- Add the Identity Provider Unique ID that was created when you set up the Google Identity Provider in the Platform as shown below.
- Reminder: You'll need the Identity Provider Unique ID to contain all uppercase characters.
- Click Create ID
https://[YourDomain]/ministryplatformapi/oauth/callback/[IdentityProviderUniqueID]
Add OAuth Data
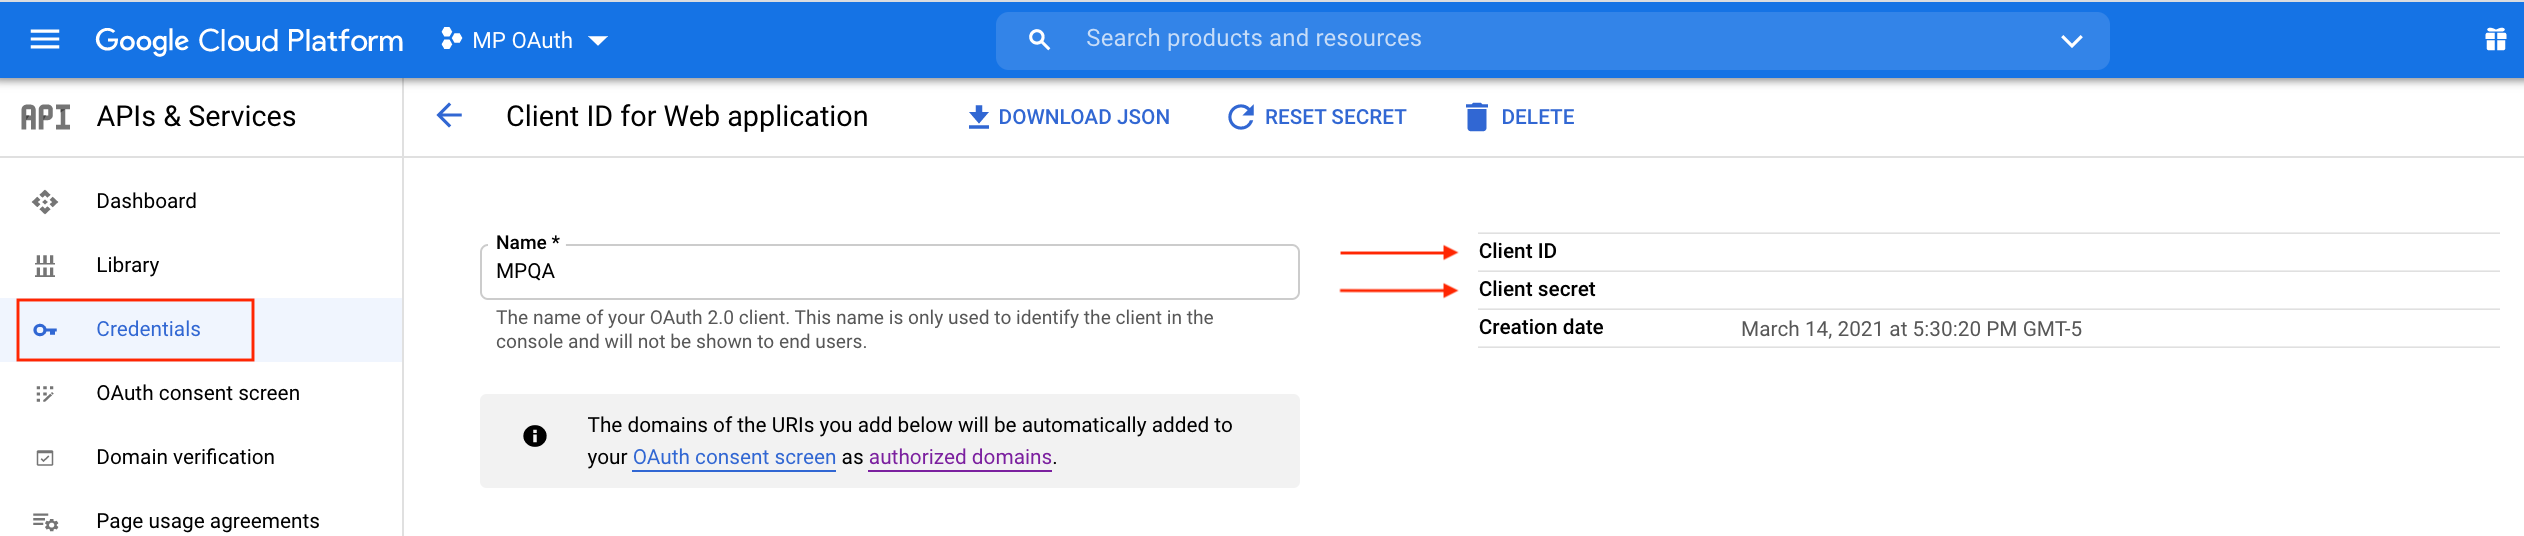
- While still on the Credentials page, select the OAuth 2.0 to reach the Client ID for Web Application page and copy the Client ID.
- Paste the Client ID into the Client ID field on the Google Identity Provider record in the Platform.
- Back on the Client ID for Web Application page, copy the Client Secret.
- Paste the Client Secret into the Client Secret field on the Google Identity Provider record in the Platform.
- While in the Platform, set the "Is Public" field to "Yes."
- Save the updated Google Identity Provider record.
Recycle the App Pool & Test
- Changes to identity providers are only picked up with a full application pool reset.
- If Setup Admin is set to True on your User record, you will have a Restart Auth App button on your User Profile. Clicking that button will make the external authentication option available.
- Pro Tip: Open an incognito window and navigate to the Platform. You should see the option to log in using Google.
- To confirm you can link your Google account to the Platform, go to the Edit User Account screen, select Social Logins and then Google. Until your app is published, it will only be available to Test Users.
- Note: You'll start with Google in testing mode. After you've confirmed the Google login is working, you'll need to return to the Google Cloud Platform Console > OAuth Consent Screen and click Publish App. You'll then be required to provide some additional information
