To create an Event:
- Go to the Events page.
- Click New, and complete the Event fields. See field information below.
- Click Save.
- Click Submit (to trigger approval process).

- Event Title: The name of the Event.
- Event Type: The category of the Event; a SPoC can control the options in Lookup Values > Event Types.
- Congregation: The Congregation the Event is for or hosted by.
- Location: The location where the Event is hosted. If no location is provided on the Event record, the location associated with the Congregation displays in the Widget.
- Meeting Instructions and Description: Information about the Event so potential participants know what to expect. Please note that neither of these fields supports HTML. Note: Adding formatting via HTML could interfere with other system functionalities.
- Program: The ongoing ministry effort this Event is a part of.
- Primary Contact: The main contact for the Event.
- Participants Expected: Maximum number of participants expected before the Registration Active field is automatically set to No. This number is calculated based on registered Participants and excludes cancelled Participants. If some are attending physically and others virtually, the number should only include those physically attending. See Special Considerations below. Note: This is a registration cap, and registration will turn off when this number is reached.
- Minutes for Setup: The number of minutes needed for setup before the Event start time.
- Event Start Date: The date and time when the Event starts.
- Event End Date: The date and time when the Event ends.
- Minutes for Cleanup: The number of minutes needed for cleanup after the Event end time.
- Cancelled: If Yes, "***Cancelled***" is automatically appended to the Event Title. Any room, equipment, and service reservations are automatically cancelled.
- Approved: A read-only field that is updated upon submission/approval.
- Visibility Level: Determines where the Event is visible:
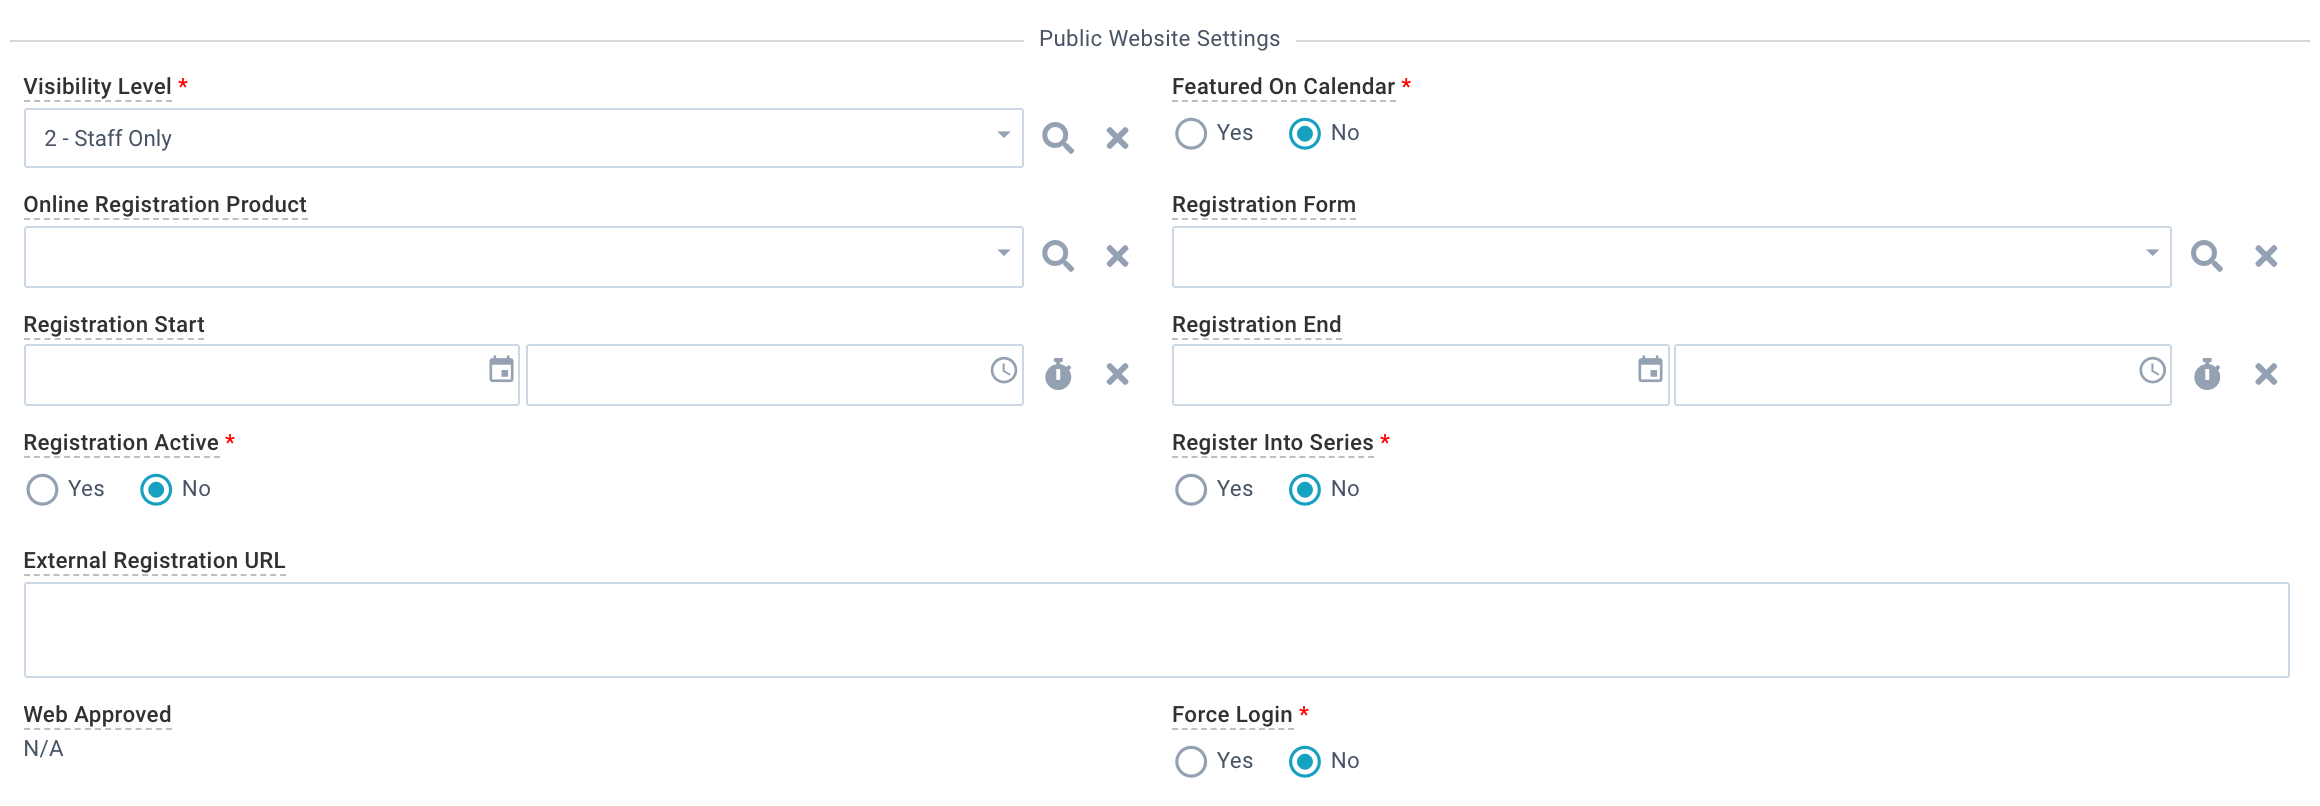
1-Private: Does not show on the Portal and are designed for internal use (for example, views, filters reports).
2-Staff Only: Does not show on the Portal and are designed for internal use by staff (for example, views, filters reports).
3-Staff & Church: Shows on the Portal with or without logging in.
4-Public: Shows on the Portal with or without logging in. This allows the Event, once it is approved, to display on the church's "Event Calendar" Portal Page. (The difference between 3-Staff & Church and 4-Public would be determined by however you might want to use them internally for views, filters, and reports.)
5-Hidden: URL Required: Shows on the Portal to individuals who have the appropriate URL. To create the URL, append your event registration URL with the Event ID# of the specific event the registration is for. To get the URL, the Event ID# would be added to the end of your usual event signup link, such as:
https://my.samplechurch.org/portal/event_signup.aspx?id=####
Featured on Calendar: When this value is set to Yes, the Event will be listed when selecting Show only Featured Events. Various third-party applications may make use of this field in other ways.
Online Registration Product: If registration is occurring for this Event, the Product controls the fee amount.
Registration Form: If you would like additional questions answered when someone is registering for the event, include a Custom Form here. Registration Start: The date registration should open.
Registration End: The date registration should close.
Registration Active: Must be Yes for registration to be open. If you want registration to close, you can manually set this field to False. But note that other items may close registration before you manually set this field to False; for example, the Participants Expected field is met or the Registration End date is met.
Register into Series: If Yes, any registrants in an Event are added to all subsequent, future Events in this Event series automatically by the nightly Data Quality routine. See Register into Series for more information. Register into series should only be used for Multi-Day Events, not for Event Series that recur over multiple weeks. See Multi-Day Events below for more information. External Registration URL: Add a complete URL (including the protocol https://) to this field if you want to use a third party form to take registrations for this event. (A Product does not need to be selected for events with an External Registration URL and will be ignored if present.) The URL in this field replaces what would normally happen when users click the Register button on the Event Registration for this Event. Note: Adding a URL to this field overrides the Registration Start, Registration End Date, and Registration Active fields and displays the "Register" button. Review your third party form settings to make sure they meet your desired registration parameters.
Web Approved: A read-only field that is updated upon submission/approval.

Allow Check-In: If Yes, this Event is eligible for the Check-In system.
Search Results: Select how you'd like your check-in search results to display in Check-in Suite: Allow Guest (Show Everyone), Allow Expected Only (Show Everyone), or Allow Expected Only (Show Expected Only).
Early Check-In Period: The number of minutes before the Event start time when individuals can begin check-in. If left blank, the default is 60
minutes. You can set this up to 24 hours (1,440 minutes) before
the start of an Event.
Late Check-In Period: The number of minutes after the Event start time that participants can check-in. If left blank, the default is 30 minutes.


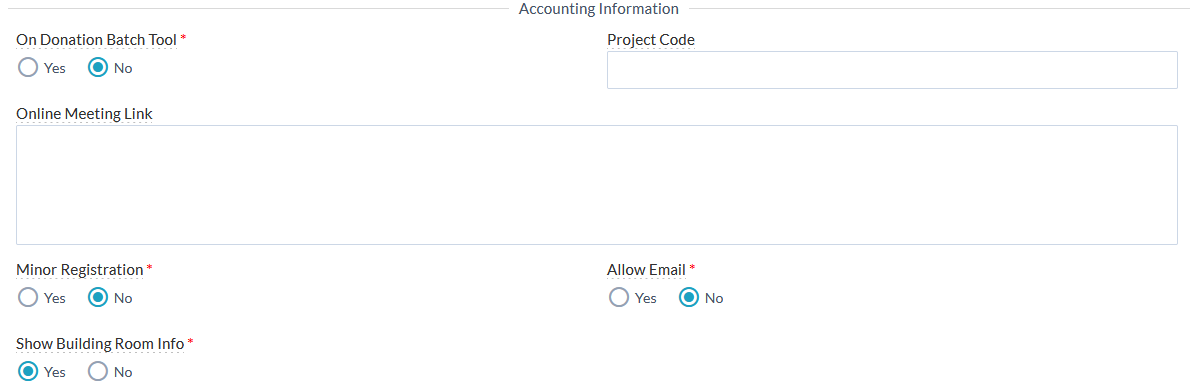
On Donation Batch Tool: Set this value to Yes for mission trips, memorials, commemoratives, and other events to which individuals may wish to earmark funds over a limited period of time. The actual dates of the event do not impact when and whether this event appears in the Batch Manager Tool.
Project Code: The project code that registration fees are charged to.
Online Meeting Link: Link for a virtual meeting or online conference call, visible to Group Leaders via GroupLife.
Minor Registration: When set to Yes, the
Event Details & Registration Widget
will display minor relevant registration fields (Date of Birth,
Parent/Guardian), so minors can be registered as the Event Participant.
Allow Email: When set to Yes, anyone can email the
Event's Primary Contact via the Event Details & Registration Widget
without logging in.
Show Building Room Info: When set to Yes, anyone can see Building Name and Room Name from any Room Reservation(s) related to this Event via the Event Details & Registration Widget without logging in. Be mindful of who should be able to see this information.
Special Considerations
Expected Participants
This field
only looks at the number of participants in the Event who have a Participation Status of Registered (not Interested or Cancelled). Participants who have
registered to attend online will not be considered when evaluating whether registration should be closed.
Registration is closed when this number is reached, but this does not prevent registrations in progress from moving forward. For example, a parent can be filling out registrations for multiple children and then submit them at one time, or two different people could be registering at the same time. This can result in total registrations exceeding this expected number. The system does not automatically reopen an Event if Registrations are cancelled or removed from the Event (a Platform user must manually set Registration Active back to Yes).
When the trigger changes the Registration Active from True to False as a result, the change will be recorded in the Audit Log.
All Day Events
Need to add a one-day event? Set the start time at 12am on the day of the event and then the end time to 12am on the next day. Your all-day event will appear on every calendar scale in all of its all-day glory!
Multi-Day Events
Events that span multiple days should be set up with a separate Event record for each day or even each session. This enables more accurate attendance, as well as the ability to leverage of facility management and Check-In functionality. This also makes it clear on your Portal Event Calendar the Start and End times for each day's Events.
If you create these Events as a recurring
Event series using Copy, you can use the Register into Series feature to register a person into all Events in the series. For example, a weekend conference might be three Events: Friday night, Saturday morning, and Saturday afternoon. See
Event Series for additional information.
Recurring Events
Learn more about recurring Events here. Note: The Register into Series option is not recommended for recurring Events.
Alternate Event Creation Methods
