Step 1: In MP
- Go to Administration > API Clients
- Click NEW
- Enter SecureGive for Display Name and Client ID
- Enter a Client Secret. This is the 'password' used by SecureGive to access your MinistryPlatform database. We highly recommend using a password generator to have your Client Secret be very unique and secure.
- Select the Client User you created for this integration
- Note that whatever Client User you choose/create, they must have a Security Role with Administrator rights.
- Authentication Flow: Authorization Code, Implicit, Hybrid, Client Credentials, or Resource Owner
- All other settings can remain the same
- Click SAVE
Step 2: In SecureGive
- Go to Settings > Export Settings
- Church Code: This is your MP Domain/URL.
- Client ID: Created in Step 3 of MP Setup (above)
- Client Secret: Created in Step 4 of MP Setup (above)
- Backfill Date: All transactions from this date forward will be marked to upload to MP, unless they have already previously uploaded (The backfill date is up to 1 year's worth of history. Additionally, a church admin can always download a CSV of their
transaction history for a manual option.)
- Click SAVE
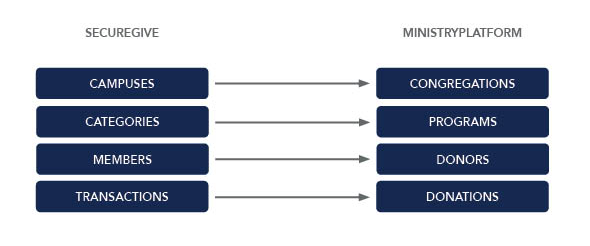
Once this API connection has been authorized, you will need to link your campuses, categories, and members (members in SecureGive = Donors in MP) in order for transactions to upload successfully. This only needs to be completed once for each.
Link Campuses with Congregations in SecureGive
- Go to Profile > Campuses and select a campus
- On the Edit Campus page, choose the respective MinistryPlatform Congregation for this campus from the dropdown
- Click Save
Link Members in SecureGive
Option 1:
- Go to Reporting > All Transactions
- In the Member ID, click on the number or the (!) icon, which means there is no existing Member ID.
- Based on the Member information in SecureGive, a list of possible MP Donor matches will show. Click Select Member to link the two accounts.
Option 2:
- Go to Users > Members
- Select your desired Member
- Next to the MinistryPlatform Donor ID field, click Find Matches
- Based on the Member information in SecureGive, a list of possible MinistryPlatform matches will show. Click Select Member to link the two Member accounts.
When all integration steps are completed, transactions will begin to upload overnight each night to MP. Be sure to monitor the Export Status column on your All Transactions report to see what transactions may need additional information in order to upload.
Donor Matching
When a transaction is successful, its Export status is labeled as Pending in SecureGive. This Pending status only refers to the API upload status, it does not pertain to the processing of the transaction. The SecureGive member will need to be linked to
their MP donor record once. Once linked, those transactions will upload nightly to MP and the Pending status will change to Uploaded. If it stays as Pending or changes to ReQueued, be sure to click on the transaction in SecureGive for more detail.
Support
Support is provided by SecureGive at support@securegive.com.
See Also
